Editing rules
Field types Text Textarea Checkbox Gtmulticheckbox Select Gtmultiselect Radio File Date Validators Alnum Between GreaterThan InArray Int LessThan StringLength Filters StringTrim HtmlEntities HTMLPurifier Required Display groups Sub forms IntroductionAn XML configuration file is responsible for formatting, validation and filtering user submited data while editing. Rules you define in this configuration file are applied to online and offline editing, this will help you maintain data according to your specification. Go to Administrator panel and click on Layers tab. Select your layer in our example it's World boundaries, right click on it and click Edit. Click on the Editing tab. In this tab you will see default rules created on upload based of your data layout, if you are not familiar with XML this is a comment <!-- COMMENT TEXT -->. <?xml version="1.0"?> <zend-config xmlns:zf="http://framework.zend.com/xml/zend-config-xml/1.0/"> <elements> <fips_cntry> <!-- Field types (from Fields and join tab) --> <type>text</type> <!-- Field type --> <options> <label>FIPS Country</label> <!-- Display name (parsed through translate file) --> <validators></validators> <!-- Validators --> <filters></filters> <!-- Filters --> <multiOptions></multiOptions> <!-- List of values for a radio group or a dropdown --> <required>1</required> <!-- Required --> </options> </fips_cntry> </elements> </zend-config> Field typesForm element type can be a text, textarea, select, radio, checkbox, date, file, gtmulticheckbox, gtmultiselect. TextBy far the most prevalent type of form element is the text element, allowing for unlimited text entry; it's an ideal element for most data entry. TextareaTextareas are used when large quantities of text are expected, and place no limits on the amount of text submitted (other than maximum size limits as dictated by your server or PHP). Example: This XML snippet shows how to create a text area and set the number of rows and columns. <phone_code> <!-- Field name (from Fields and join tab) --> <type>textarea</type> <!-- Field type --> <options> <label>Phone code</label> <!-- Display name (parsed through translate file) --> <rows>10</rows> <!-- Number of rows --> <cols>10</cols> <!-- Number of columns --> </options> </phone_code> CheckboxHTML checkboxes allow you to return a specific value, but basically operate as booleans. By default, the checked value is "1", and the unchecked value "0". You can specify the values to use for the checkedValue and uncheckedValue properties, respectively. Internally, any time you set the value, if the provided value matches the checked value, then it is set, but any other value causes the unchecked value to be set. Example: This XML snipet shows how to create a checkbox that will set the value to "t" if checked and "f" if unchecked. <active> <!-- Field name (from Fields and join tab) --> <type>checkbox</type> <!-- Field type --> <options> <label>Active</label> <!-- Display name (parsed through translate file) --> <checkedValue>t</checkedValue> <!-- Checked value (parsed through translate file) --> <uncheckedValue>f</uncheckedValue> <!-- Unchecked value (parsed through translate file) --> </options> </active> GtmulticheckboxWhen you want to save multiple user choices in a database table text field you can use this element. Selected values are collected in a string separated by ", ". The list of values and labels are read from a table in the database. For multi elements the "id" and "name" columns in the database table must have identical values. The database table can be created by uploading a dbf file (single file no .shx or .shp) using the Upload section or manually created using the Add section of the Administrator panel. Table values can be edited in the Edit data section of the Administrator panel. By default, this element registers an InArray validator which validates against the array keys of registered options. Example: This XML snippet shows how to create a multi checkbox element that will read and set it's options from the "building_types" database table. <building_types> <!-- Field name (from Fields and join tab) --> <type>gtmulticheckbox</type> <!-- Field type --> <options> <label>Building types</label> <!-- Display name (parsed through translate file) --> <database> <!-- Populate multiOptions from database --> <table>building_types</table> <!-- Table name --> <id>key</id> <!-- Key field name --> <name>building_type</name> <!-- Value field name --> </database> </options> </building_types> SelectSelect elements are a common way of limiting to specific choices for a given form datum. The list of values and labels are read from a table in the database. The database table can be created by uploading a dbf file (single file no .shx or .shp) using the Upload section or manually created using the Add section of the Administrator panel. Table values can be edited in the Edit data section of the Administrator panel. By default, this element registers an InArray validator which validates against the array keys of registered options Example: This XML snippet shows how to create a select element that will read and set it's options from the "countries_codes" database table. <phone_code> <!-- Field name (from Fields and join tab) --> <type>select</type> <!-- Field type --> <options> <label>Phone code</label> <!-- Display name (parsed through translate file) --> <database> <!-- Populate multiOptions from database --> <table>countries_codes</table> <!-- Table name --> <id>country_code</id> <!-- Key field name --> <name>country_name</name> <!-- Value field name --> </database> </options> </phone_code> The editing form will display the select element values as intended, but Information, Search and other tools show the field "id" not "name". This can be fixed in the Fields and joins section by creating a join rule between the table countries_codes and your main table. GtmultiselectWhen you want to save multiple user choices in a database table text field you can use this element. Selected values are collected in a string separated by ", ". The list of values and labels are read from a table in the database. For multi elements the "id" and "name" columns in the database table must have identical values. The database table can be created by uploading a dbf file (single file no .shx or .shp) using the Upload section or manually created using the Add section of the Administrator panel. Table values can be edited in the Edit data section of the Administrator panel. By default, this element registers an InArray validator which validates against the array keys of registered options Example: This XML snippet shows how to create a multi checkbox element that will read and set it's options from the "building_types" database table. <building_types> <!-- Field name (from Fields and join tab) --> <type>gtmultiselect</type> <!-- Field type --> <options> <label>Building types</label> <!-- Display name (parsed through translate file) --> <database> <!-- Populate multiOptions from database --> <table>building_types</table> <!-- Table name --> <id>key</id> <!-- Key field name --> <name>building_type</name> <!-- Value field name --> </database> </options> </building_types> RadioRadio elements allow you to specify several options, of which you need a single value returned. The configuration is the same as for Select. FileThe File form element provides a mechanism for supplying file upload fields to your form. Example: This configuration shows how to create a file element with a file size limit and a specified list of allowed extensions. <photo> <!-- Field name (from Fields and join tab) -->
<type>file</type> <!-- Field type -->
<options>
<label>photo</label> <!-- Display name (parsed through translate file) -->
<validators>
<!-- First validator -->
<count>
<validator>Count</validator> <!-- Counts how many files should be received -->
<options>
<files>1</files> <!-- Number of files to be received -->
</options>
</count>
<!-- Second validator -->
<filessize>
<validator>FilesSize</validator> <!-- Limits the size of the uploading file -->
<options>
<min>1</min> <!-- Minimum file size -->
<max>2MB</max> <!-- Maximum file size -->
</options>
</filessize>
<!-- Third validator -->
<ext>
<validator>Extension</validator> <!-- Receives files only with specified extensions -->
<options>
<extension>jpg,png,gif</extension> <!-- List of extensions separated by comma -->
</options>
</ext>
</validators>
</options>
</photo>DateThis element can be used to specify a certain date of year. It uses a standart text field and enhances it with a calendar for an easier date selection. <install_date> <!-- Field name (from Fields and join tab) -->
<type>date</type> <!-- Field type -->
<options>
<label>Install date</label> <!-- Display name (parsed through translate file) -->
</options>
</install_date>ValidatorsA validator examines its input with respect to some requirements and produces a boolean result - whether the input successfully validates against the requirements. If the input does not meet the requirements, a validator may additionally provide information about which requirement(s) the input does not meet. For example a field must be between six and twelve characters in length and may only contain alphanumeric characters. A validator can be used for ensuring that fields meet these requirements. If a chosen field does not meet one or both of the requirements, it would be useful to know which of the requirements the field fails to meet. <validators> <!-- First validator --> <strlen612> <!-- Validator name (arbitrary) --> <validator>StringLength</validator> <!-- Validator class name --> <options> <!-- Options --> <min>6</min> <!-- "min" option with value 6 --> <max>12</max> <!-- "max" option with value 12 --> </options> <breakChainOnFailure>1</breakChainOnFailure> </strlen612> <!-- Second validator --> <alphanum> <!-- Validator name (arbitrary) --> <validator>Alnum</validator> <!-- Validator class name --> </alphanum> </validators> breakChainOnFailure will the validator to break the chain execution upon failure, which avoids running any other validations that are determined to be unnecessary or inappropriate for the situation. AlnumReturns TRUE if and only if value contains only alphabetic and digit characters. BetweenReturns TRUE if and only if value is between the minimum and maximum boundary values. The comparison is inclusive by default (value may equal a boundary value), though this may be overridden in order to do a strict comparison, where value must be strictly greater than the minimum and strictly less than the maximum. <myBetween> <!-- Validator name (arbitrary) --> <validator>Between</validator> <!-- Validator class name --> <options> <!-- Options --> <min>0</min> <!-- "min" option with value 0 --> <max>100</max> <!-- "max" option with value 100 --> </options> </myBetween> GreaterThanReturns TRUE if and only if value is greater than the minimum boundary. <gt> <!-- Validator name (arbitrary) --> <validator>GreaterThan</validator> <!-- Validator class name --> <options> <!-- Options --> <min>5</min> <!-- "min" option with value 5 --> </options> </gt> InArrayInArray allows you to validate if a given value is contained within an array. It is also able to validate multidimensional arrays. <inarray> <!-- Validator name (arbitrary) --> <validator>InArray</validator> <!-- Validator class name --> <options> <!-- Options --> <haystack> <!-- Array of available values --> <key1>up</key1> <key2>down</key2> <key3>left</key3> </haystack> </options> </inarray> IntReturns TRUE if and only if value is a valid integer. Example: Create an integer validator. If the value is not an integer then a validation note will appear and the user will be prompted to enter a value that represents a number. <integer> <!-- Validator name (arbitrary) --> <validator>Int</validator> <!-- Validator class name --> </integer> LessThanReturns TRUE if and only if value is less than the maximum boundary. <lt> <!-- Validator name (arbitrary) --> <validator>LessThan</validator> <!-- Validator class name --> <options> <!-- Options --> <max>5</max> <!-- "max" option with value 5 --> </options> </lt> StringLengthReturns TRUE if and only if the string length of value is at least a minimum and no greater than a maximum (when the max option is not NULL). Example: Create a string lenght validator. If the length of text entered by the user is more than 80 characters then a validation note will appear and the user will be prompted to introduce valid data. <strlen> <!-- Validator name (arbitrary) --> <validator>StringLength</validator> <!-- Validator class name --> <options> <!-- Options --> <max>100</max> <!-- "max" option with value 100 --> </options> </strlen> FiltersIn the physical world, a filter is typically used for removing unwanted portions of input, and the desired portion of the input passes through as filter output (e.g., coffee). In such scenarios, a filter is an operator that produces a subset of the input. This type of filtering is useful for removing illegal input, trimming unnecessary white space, etc. This basic definition of a filter may be extended to include generalized transformations upon input. A common transformation applied in web applications is the escaping of HTML entities. For example, if a form field is automatically populated with untrusted input (e.g., from a web browser), this value should either be free of HTML entities or contain only escaped HTML entities, in order to prevent undesired behavior and security vulnerabilities. To meet this requirement, HTML entities that appear in the input must either be removed or escaped. Of course, which approach is more appropriate depends on the situation. A filter that removes the HTML entities operates within the scope of the first definition of filter - an operator that produces a subset of the input. A filter that escapes the HTML entities, however, transforms the input (e.g., "&" is transformed to "&"). <filters> <!-- First filter --> <ent> <!-- Filter name (arbitrary) --> <filter>HtmlEntities</filter> <!-- Filter class name --> </ent> <!-- Second filter --> <trim> <!-- Filter name (arbitrary) --> <filter>StringTrim</filter> <!-- Filter class name --> </trim> </filters> StringTrimReturns the string value with characters stripped from the beginning and end. <trim> <!-- Filter name (arbitrary) --> <filter>StringTrim</filter> <!-- Filter class name --> </trim> HtmlEntitiesThis filter is useful in preventing user-supplied text from containing HTML markup. Returns the string value, converting characters to their corresponding HTML entity equivalents where they exist. <ent> <!-- Filter name (arbitrary) --> <filter>HtmlEntities</filter> <!-- Filter class name --> </ent> HTMLPurifierReturns the string value with malicious html code filtered out. <purify> <!-- Filter name (arbitrary) --> <filter>HTMLPurifier</filter> <!-- Filter class name --> </purify> See filter classes for a complete list. RequiredSets where filling of the field is required or not. 0 - not required, 1 - required. <required>1</required> Display groupsDisplay groups are a way to create virtual groupings of elements for display purposes. All elements remain accessible by name in the form, but when iterating over the form or rendering, any elements in a display group are rendered together. The most common use case for this is for grouping elements in fieldsets. Each display group will have a expand/collapse button. This enables the possibility to view a certain group of elements one at a time. <DisplayGroups>
<DisplayGroup1>
<Elements>
<el1>osm_id</el1>
<el2>name</el2>
</Elements>
<Options>
<Name>my_group1</Name>
<Legend>My group 1</Legend>
</Options>
</DisplayGroup1>
<DisplayGroup2>
<Elements>
<el3>type</el3>
<el4>file</el4>
</Elements>
<Options>
<Name>my_group2</Name>
<Legend>My group 2</Legend>
</Options>
</DisplayGroup2>
</DisplayGroups>This is a visual example of how display groups are rendered: 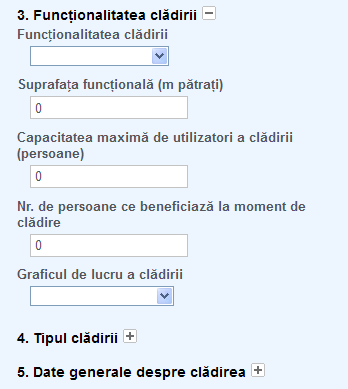
Sub formsSubforms allows users to specify multiple times a predefined set of fields. At the moment subform functionality has the following limitations: Does not work in the mobile layout and history is not recorded.
Go to Administrator panel - Layers - Edit (buildings) - Editing rules and change it to: <?xml version="1.0"?>
<zend-config xmlns:zf="http://framework.zend.com/xml/zend-config-xml/1.0/">
<elements>
<address>
<type>text</type>
<options>
<label>address</label>
</options>
</address>
<owner>
<type>text</type>
<options>
<label>owner</label>
</options>
</owner>
<width> <!-- Subform field (needs to be created manually) -->
<type>text</type>
<options>
<label>width</label>
</options>
</width>
<height> <!-- Subform field (needs to be created manually) -->
<type>text</type>
<options>
<label>height</label>
</options>
</height>
</elements>
<DisplayGroups>
<windows> <!-- The display group of our subform -->
<Elements> <!-- All the fields that are part of the subform -->
<el1>width</el1>
<el2>height</el2>
</Elements>
<Options>
<Name>windows</Name>
<Legend>Windows</Legend>
<subform>1</subform> <!-- Required -->
<database>
<table>buildings_windows</table> <!-- Subform table name -->
</database>
</Options>
</windows>
</DisplayGroups>
</zend-config>
COPYRIGHT ® 2012, VEC |