Layers
Add layer Add container Add vector layer Add raster layer Add WMS layer Add WFS layer Add Javascript layer Edit layer Edit container General Name Edit vector layer General Name Classes and styles Fields and joins Editing rules Default settings Label WMS WFS Publish Share Metadata Routing Cluster Edit raster layer General Name Default settings WMS WCS Publish Permissions Metadata Edit WMS layer General Name Authentication Default settings WMS Publish Permissions Metadata Edit WFS layer General Name Authentication Default settings WMS WFS Publish Permissions Metadata Edit javascript layer General Name Default settings Publish Permissions Metadata Delete layer Merged layers IntroductionThis section will help you add new layers, edit their look, how they behave, who can access them, publish them to the public and any other layer related functionality. Layers are created from various data: vector(PostGIS tables), raster, wms. You can have multiple layers that use the same data but have different behaivor. Add layerYou can expand the Layers tree branch by clicking + or -. Click on Expand to view full layer structure. If you are administrator you can click the Show users layers button to view all user layers. To add a layer or a container you need to right click on a node and click Add (this node will be the parent, right click on Root node to add the layer or container to the top). Add containerContainer type is used when you need to group other layers. Specify your container name and click Submit. You will be redirected to layer edit section, make the layer active by checking the Active checkbox and click Submit. Add vector layerVector type is used when you need to create a layer from existing vector data. Class. Is an unique identifier of the layer in the system. Enter a name that relates to your data for example "Railrd". Table. PostGIS table that will be used as a data source. See Database on how to upload new vector data to the system. Name. Display name of the layer. Click Submit to add your layer, your layer is now added and populated with default values. You will be redirected to Edit vector layer section, make the layer active by checking the Active checkbox and click Submit. Add raster layerRaster type is used when you need to create a layer from existing raster data. Only available for administrators. If you have multiple raster files that you want to display as a single layer use tile indexing. Before you add your raster data to Giscuit it is recommended to build overviews and reproject data to your display projection. Class. Is an unique identifier of the layer in the system. Enter a name that relates to your data for example "Ortophoto". Data. Name or path of the single georeferenced raster data file. You can use raster image formats supported by GDAL. If only the file name is specified the system looks it in the raster folder. Tile index. Name of the tileindex file. The tileindex contains polygon features for each tile. The item that contains the location of the tiled data is given using the Tile item parameter. When a file is used as the tileindex for raster layers, the tileindex should be a shapefile. Normally the location should contain the path to the tile file relative to raster folder, not relative to the tileindex itself. If the Data parameter contains a value then it is added to the end of the location. Tile item. Item that contains the location (column) of an individual tile, default is "location" in the tile index. Name. Display name of the layer. Click Submit to add your layer, your layer is now added. You will be redirected to Edit raster layer section, make the layer active by checking the Active checkbox and click Submit. Add WMS layerWMS type is used when you need to create a layer from a WMS connection. Only available for administrators. Class. Is an unique identifier of the layer in the system. Enter a name that relates to your data for example "Modis". URL. This is the remote server's online resource URL, just the base URL without any of the WMS parameters. Authentication. Set these parameters if remote server requires authentication:
Layers. If the correct remote address (and authentication if necessary) are specified a list of available layers will be displayed. This list is refreshed when any of the connection parameters is changed. Name. Display name of the layer. Click Submit to add your layer, your layer is now added. You will be redirected to Edit WMS layer section, make the layer active by checking the Active checkbox and click Submit. Add WFS layerWFS type is used when you need to create a layer from a WFS connection. Only available for administrators. Class. Is an unique identifier of the layer in the system. Enter a name that relates to your data for example "Modis". URL. This is the remote server's online resource URL, just the base URL without any of the WFS parameters. Authentication. Set these parameters if remote server requires authentication:
Layers. If the correct remote address (and authentication if necessary) are specified a list of available layers will be displayed. This list is refreshed when any of the connection parameters is changed. Name. Display name of the layer. Click Submit to add your layer, your layer is now added. You will be redirected to Edit WFS layer section, make the layer active by checking the Active checkbox and click Submit. Add Javascript layerJavascript type is used when want to import layer data through javascript. Only available for administrators. Class. Is an unique identifier of the layer in the system. It must match the javascript file name located in "public/static/js/giscuit/Layer/" folder. Name. Display name of the layer. Click Submit to add your layer, your layer is now added. You will be redirected to Edit javascript layer section, make the layer active by checking the Active checkbox and click Submit. Edit layerYou can expand the Layers tree branch by clicking + or -. Click on Expand to view full layer structure. To edit a layer or a container you need to right click on a node and click Edit. Edit containerGeneralActive. Is the layer active or not. If the layer is inactive it can't be used anywhere and by anyone. Container. Container to which the current layer belongs too. NameSet the name of the container in all available languages. Edit vector layerGeneralActive. Is the layer active or not. If the layer is inactive it can't be used anywhere and by anyone. Container. Container to which the current layer belongs too. Minimum view scale. Minimum scale at which this layer is visible. Scale is given as the denominator of the actual scale fraction. For example if you enter 10000, the layer will be visibile from scale 1:1 to 1:10000. Maximum view scale. Maximum scale at which this later is visible. Scale is given as the denominator of the actual scale fraction. For example if you enter 10000, the layer will be visibile until 1:10000 scale is reached. Opacity. Sets the opacity level (or the inability to see through the layer) of all classed pixels for a given layer. The value can be an integer in the range (0-100 . A value of 100 is opaque and 0 is fully transparent. Filter (Available only for administrators). This parameter allows source data filtering that is done at the database level, before any CLASS expressions are evaluated. The string is a SQL WHERE clause that is valid with respect to the underlying database. For example: (railrd.type = 'default' and railrd.size < 2) Minimum edit scale. Minimum scale at which this layer will be editable. Scale is given as the denominator of the actual scale fraction. For example if you enter 10000, it means that layer will be editable from scale 1:1 up 1:10000. Minimum snap scale. Minimum scale at which this layer will be snappable. Scale is given as the denominator of the actual scale fraction. For example if you enter 10000, it means that you can snap to geometries from scale 1:1 to 1:10000 Tolerance. Sensitivity for point based queries (i.e. via mouse and/or map coordinates). To restrict polygon searches so that the point must occur in the polygon set the tolerance to zero. Search scale. For point layer only. Sets the scale of the map when showing search results. Scale is given as the denominator of the actual scale fraction. NameSet the name of the layer in all available languages. Classes and stylesClass label active. This should be checked if you want to use custom labels per class for current layer when serving it via WMS or publishing it. You will also need to check Label checkbox in the Default settings tab. Classes To add a new class click add button, you can now edit class data by double clicking on the cell of the data table. To delete a class click on it's Id field, this will enable the Delete button, click on it to delete the class. Classes data table description: Name. Is an unique identifier of the class for this layer. Enter a name that relates to your data for example "railrd_local". The translated class name will be also used for legend construction, this will allow you to display the legend text based on currently user selected language. Expression. Create an expression to describe features that belong to this class. In an expression you can only use fields with Visibility option set to Map Style or Both in the Fields data table of the Fields tab. If no expression is given, then all features are said to belong to this class. Logical expressions allow you to build fairly complex tests based on one or more attributes. Logical expressions are delimited by parentheses "(expression)". Attribute names are delimited by square brackets "[ATTRIBUTE]". These names are case sensitive and must match the items in the database. For example: ([population] > 50000 AND '[language]' eq 'FRENCH'). The following logical operators are supported: =,>,<,<=,>=,==,or,and,lt,gt,ge,le,eq,ne. Note that fields that contain text values must be escaped with single quotes, example: ('[text_field]'). Example 1. You have a "population" field in the countries table, and you want features with population bigger than 500000 to belong to this class. The expression will look like this: [population] > 500000 Example 2. You have a "community" field in the countries table, and you want features of European community to belong to this class. The expression will look like this: '[community]' = 'European community' Expressions are created using MapServer expressions rules, please read this document to get an in depth understanding of mapserver expressions. Minimum view scale. Minimum scale at which this class is visible. Scale is given as the denominator of the actual scale fraction. For example if you enter 10000, the class will be visibile from scale 1:1 to 1:10000. Maximum view scale. Maximum scale at which this class is visible. Scale is given as the denominator of the actual scale fraction. For example if you enter 10000, the class will be visibile until 1:10000 scale is reached. Label active. Activate custom label for current class, double click on the cell to configure label proprieties. You can find a detailed description of the label propreties in the Label tab. Legend. Display legend for this class or hide it. Styles To add a new style select a class by clicking on it's Id then click Add button in styles data table, you can now edit style data by double clicking on the cell of the style data table. To delete a style click on it's Id field, this will enable the Delete button, click on it to delete the class. Styles data table description: Color. Color to use for drawing features Outline color. Color used for outlining polygons and certain marker symbols. Line symbols do not support outline colors. Background color. Color used for non-transparent symbols Width. Width refers to the thickness of line work drawn. Default is 1. For symbols of Type HATCH, the WIDTH is how thick the hatched lines are. Size. Height of the symbol/pattern to be used. Only useful with scalable symbols. Default is 1. For symbols of Type HATCH, the SIZE is the distance between hatched lines. Symbol name. Name of the symbol. For custom symbology creation see Symbols. Angle. Angle, given in degrees, to draw the line work. Default is 0. For symbols of Type HATCH, this is the angle of the hatched lines. Opacity. Opacity to draw the current style in the percentage. The value can be an integer in the range (0-100 . A value of 100 is opaque and 0 is fully transparent. The following features are available for MapServer version 6 and above: Pattern. Used to define a dash pattern for line work (lines, polygon outlines, ...). The numbers (doubles) specify the lengths of the dashes and gaps of the dash pattern in layer SIZEUNITS. Gap. GAP specifies the distance between SYMBOLs (center to center) for decorated lines and polygon fills in layer SIZEUNITS. For polygon fills, GAP specifies the distance between SYMBOLs in both the X and the Y direction. For lines, the centers of the SYMBOLs are placed on the line. Linecap. Sets the line cap type for lines. Default is round. Linejoin. Sets the line join type for lines. Default is round. Linejoinmaxsize. Sets the max length of the miter LINEJOIN type. The value represents a coefficient which multiplies a current symbol size. Default is 3. Fields and joinsFields and joins data is used to compute the layer SQL query in the following way: SELECT field_expression as field_name FROM table LEFT JOIN join_table on join_expression. This query is later used to render the map, get information and search. Default field. Default field for information and search Fields To add a new field click on it's Id then click Add button in fields data table, you can now edit field data by double clicking on the cell of the fields data table. To delete a field click on it's Id field, this will enable the Delete button, click on it to delete the field. If you are not Administrator you can only edit the Visibility field. Fields data table description: Name. Name of the field. If Expression is empty this will be used as a field name and should match an existing field in the database. Expression. SQL expression that describes the field. You can enter an expression that represents a field name of a current or joined table, concatenate multiple fields, filter your field values throught various PostgreSQL functions. Note that it is recommended to specify database table name before field name (ex. "roads.type") to avoid ambiguous column references. Visibility. Controls the visibility of a field in different system controls.
Escape. Certain characters have special significance in HTML, and should be represented by HTML entities if they are to preserve their meanings. This will protect you from Cross Site Scripting (XSS) attacks. Joins (Only available for administrators) To add a new join click on it's Id then click Add button in joins data table, you can now edit join data by double clicking on the cell of the joins data table. To delete a join click on it's Id field, this will enable the Delete button, click on it to delete the join. Joins data table description: Table. Name of the table to be joined Expression. SQL expression that describes the join condition. For example we want to join streets.street_id ("streets" is our main table) with street_names.id ("street_name" table and field "id"). First select Table "street_names" from the table list and set Expression to "streets.street_id = street_names.id". Now that we have our tables joined let's add a new field "description" from the joined table. Go to fields data table and click Add, now edit it's Name cell by double clicking on it and enter "my_description" for example, set the Expression of this field to "street_names.description". Editing rulesForm. See Editing rules tutorial. Maximum gps accuracy. If the gps accuracy exceeds this value, user will be notified before adding a point. Default settingsOnly available for administrators. Set the default layer settings of the layer upon user first access. This settings are also used when the layer is served via WMS and when published. View. Is the layer visible by default Information. Is the layer queryable by default Label. Will the layer have a label by default Edit. Is the layer editable by default LabelLabel fields. Fields that will be joined into your default label, separated by Label separator. If you need a custom label, create a field with an expression that meets your needs and then select it here. Label separator. String that will act as a separator if multiple Label fields are selected. By default the value is "\n" - new line. Size. Size of the label Font. Font of the label Color. Hexadecimal value of label color Position. Position of the label relative to the labeling point. With points you can selects from 8 outer positions (i.e. excluding Middle center). With polygons you can select from Middle center, Upper center, Bottom center, Middle left and Middle right as possible positions. With lines you can only use Bottom center or Upper center, until it finds a position that doesn't collide with labels that have already been drawn. If all positions cause a conflict, then the label is not drawn. Angle. Angle of the label.
Minimum size. Minimum size of a feature given in pixels in order to be labeled. For line data the overall length of the displayed line is used, for polygons features the smallest dimension of the bounding box is used. Use "1" value to always display the label. Buffer. Padding, in pixels, around labels. Useful for maintaining spacing around text to enhance readability. Repeat distance. The label will be repeated on every line of a multiline shape and will be repeated multiple times along a given line at an given interval of pixels. Background color. Color to draw a background rectangle. Priority. Labels are stored in the label cache and rendered in order of priority, with the highest priority levels rendered first. Wrap. Character that represents an end-of-line condition in label text, thus resulting in a multi-line label. Interacts with Maxlength for conditional line wrapping after a given number of characters. Align. Specifies text alignment for multiline labels (see Wrap) Note that the alignment algorithm is far from precise, so don't expect fabulous results (especially for right alignment) if you're not using a fixed width font. Maxlength. Interacts with the WRAP keyword so that line breaks only occur after the defined number of characters
WMSA Web Map Service (WMS) is a standard protocol for serving georeferenced map images over the Internet that are generated by a map server using data from a GIS database. The specification was developed and first published by the Open Geospatial Consortium in 1999. More information can be found here. This section allows the publishing of the layer through this service. Publish privately. Access Web Map Service with authentication. Default address is http://domainname/en/default/wms/private. Publish publicly (Available only for administrators). Access Web Map Service without authentication. Default address is http://domainname/en/default/wms/public. WFSA WFS ( Web Feature Service ) publishes feature-level geospatial data to the web. This means that instead of returning an image the client now obtains fine-grained information about specific geospatial features of the underlying data, at both the geometry AND attribute levels. More information can be found here. This section allows the publishing of the layer through this service. Publish privately. Access Web Feature Service with authentication. Default address is http://domainname/en/default/wfs/private. Publish publicly (Available only for administrators). Access Web Feature Service without authentication. Default address is http://domainname/en/default/wfs/public. PublishAvailable only for administrators Publish destination. How is the layer published, as an overlay or as a part of a base layer. Hold ctrl and click to select or deselect multiple options. Publish selected. Used for overlays only. Is the overlay selected (visible) by default. Format. Used for overlays only. PNG or PNG24. Select PNG if you want map loading time to be shorter but loose some image quality if your image has more than 256 colors. To have best image quality with increased loading time use PNG24. Clear cache. Clear the cache created by direct requests or by seeding, this can take some time depending on your cache size. ShareShare via ACL (Available for administrators and users with special permission) To share via ACL (Access Control List) use the following fields: Resource. Layer resource, for more details on permissions see Access control list. If no resource is selected then "Registered" resource is applied, this means that only members of the "Registered" role and roles that extend it can view the current layer. View privilege. Privilege that allows viewing the current layer Edit privilege. Privilege that allows geometry editing of the current layer Edit attributes only privilege. Privilege that allows attribute editing of the current layer Access OWS services privilege. Privilege that allows access via WMS or WFS to the current layer To see an example of configuring layer through ACL check Assigning privileges to layers. Share directly To share directly with a certain user use the following method: Use the Add user field to type in first name and/or last name of the user you want to share the layer with, then click on the result to add him to data table below. Data table consists of the following fields:
To remove a user from the table click on his Username field, then click Delete button below the data table. To save all the changes made (this includes adding/removing a user or changing privileges of existing users) click the Save button below the data table. MetadataThis section controls layer metadata. To view global layers metadata documentation see Metadata. Values from this data table are merged with values from global metadata data table. If both sources have an identical keyword then the value from this table will be shown. Information consists of a keyword and it's value in a specific language. This is the list of available keywords:
To add metadata click add button, a new empty entry should appear. Now double click on the keyword field to add a keyword. To add a value in a specific language double click on the corresponding keywords language field to add value. After you have done adding metadata click Save button to save changes. To delete metadata click on a keyword field, then click Delete button to delete the keyword. To edit metadata double click on a keyword field or it's value field to edit it. After you have done editing click Save button to save changes. RoutingAvailable only for administrators This section is available for line type layers only. Build graph. Click to build a graph, without this graph routing cannot be enabled for this layer. Two options are available:
Active. Check to make layer available for routing. Note that a layer cannot be set for routing if a graph wasn't built. Source. A geocoder source that is used in autocomplete functionality for specifying routing points. Available options are specified in Geocode options section. Directed. If checked the algorithm will take into consideration the direction (from start to end) of the geometries. Reverse cost. Works only if Directed option is checked. Enables separate cost for reverse path traversing. Algorithm. A list of algorithms that can be used by users for route calculation. Available algorithms are:
Cost columns table. This table is used to specify cost columns for the paths. This can be used to lower the traversing costs for certain type of paths (ex. highway roads) and rising them for other types (ex. pedestrian roads), thus making the algorithm create a route that is more suitable for a certain group of users (ex. people traveling by cars). This way different users can choose to calculate routes that suit them more (ex. a route by car or by bike or by foot). Each entry represents a different set of costs by specifying the cost column. The table consists of:
To add a new entry in the table click Add button below the table. To remove an existing entry in the table click Delete button below the table. Note that the column will still exist in the database, but the users won't be able to use it for routing. To remove the column completely use the database Edit table section. To give an example of how to set costs for paths we will use Roads data added using Upload data and create layers tutorial. First we will go to database Edit table section, select our roads table and edit it. There we will create a new column named 'cost_coef' and another one named 'reverse_cost_coef' both of 'real' type with default value of '1'. Now using pgAdmin or phpPgAdmin or any other database administration tool the following queries should be executed: UPDATE giscuit_layers.roads SET cost_coef = 1;
UPDATE giscuit_layers.roads SET cost_coef = 2.0 WHERE type IN ('pedestrian', 'steps','footway', 'track', 'path', 'service');
UPDATE giscuit_layers.roads SET cost_coef = 0.8 WHERE type IN ('secondary', 'secondary_link', 'tertiary', 'tertiary_link', 'residential');
UPDATE giscuit_layers.roads SET cost_coef = 0.6 WHERE type IN ('primary','primary_link');
UPDATE giscuit_layers.roads SET cost_coef = 0.4 WHERE type IN ('trunk','trunk_link');
UPDATE giscuit_layers.roads SET cost_coef = 0.3 WHERE type IN ('motorway','motorway_junction','motorway_link');
UPDATE giscuit_layers.roads SET reverse_cost_coef = cost_coef;
UPDATE giscuit_layers.roads SET reverse_cost_coef = reverse_cost_coef * -1 WHERE oneway = 1;In this example giscuit is the name of the schema that was specified during the installation process and roads is the name of the database table that contains road data and cost columns. The reverse cost coefficients are the same as standart costs, but for one way roads they are set to negative value, which means that going in reverse on a one way road will be impossible. These cost coefficients are effective for obtaining car routes. ClusterThis section is available for point type layers only. Clustering is the ability to combine multiple features into single (aggregated) features based on their relative positions. This section has the following configuration options: Active. Check to enable clustering for this layer. Maximum distance. Specifies the distance of the search region (rectangle or ellipse) in pixel positions. Buffer. Defines a buffer region around the map extent in pixels. Default is 0. Using a buffer allows that the neighbouring shapes around the map are also considered during the cluster creation. Region. Defines the search region around a feature in which the neighbouring features are negotiated. Can be 'rectangle' or 'ellipse'. Group. Features can be clustered by a certain field value. Note that the selected field must have visibility set to 'Map style' or 'Everywhere'. Filter. Define an expression to filter some of the features from the final output. Note that if a field is used it must have visibility set to 'Map style' or 'Everywhere'. Reserved keywords like Cluster:FeatureCount, Cluster:Group can be used in Classes and styles to control how the cluster features and their labels look. Example 1. Creating two styles for clustered features and one for features that are not a part of a cluster. In Classes and styles section of a point layer check the Class label active field. In the Cluster section check the Active checkbox and set the value of Maximum distance to '75'. Delete all classes and create 3 classes in Classes table: named 'points_cluster_1', 'points_cluster_2' and 'points_default', 'points_cluster_1' and 'points_cluster_2' being above 'points_default' in the table. Click on the Label active field of the 'points_default' class and then check the 'Active' field. The style parameters for 'points_default' class are the following:
Set 'points_cluster_1' Expression field to '([Cluster:FeatureCount] > 1 AND [Cluster:FeatureCount] < 10)'. Click on the Label active field of that class, fill the form with the following parameters:
Set the style parameters of 'points_cluster_1' to the following:
Set 'points_cluster_2' Expression field to '([Cluster:FeatureCount] > 10)'. Click on the Label active field of that class, fill the form with the following parameters:
Set the style parameters of 'points_cluster_2' to the following:
The configuration above will group all features in the 75 pixel radius and render them as big red circles with the cluster feature count as a label, and features that are not part of the cluster as smaller green circles. 
Example 2. Creating 3 styles for clustered features with different groups and one for features that are not a part of a cluster. In Classes and styles section of a point layer check the Class label active field. In the Cluster section check the Active checkbox and set the value of Maximum distance to '75' and Group to 'type' field. Delete all classes and create 4 classes in Classes table: named 'points_bus_stops', 'points_traffic_signals', 'points_fast_food', 'points_default' and place the 'points_default' class below the other ones. Click on the Label active field of the 'points_default' class and then check the 'Active' field. The style parameters for 'points_default' class are the following:
Set 'points_bus_stops' Expression field to '([Cluster:FeatureCount] != 1 AND '[Cluster:Group]' = 'bus_stop')'. Click on the Label active field of that class, fill the form with the following parameters:
Set the style parameters of 'points_bus_stops' to the following:
Set 'points_traffic_signals' Expression field to '([Cluster:FeatureCount] != 1 AND '[Cluster:Group]' = 'traffic_signals')'. Click on the Label active field of that class, fill the form with the following parameters:
Set the style parameters of 'points_traffic_signals' to the following:
Set 'points_fast_food' Expression field to '([Cluster:FeatureCount] != 1 AND '[Cluster:Group]' = 'fast_food')'. Click on the Label active field of that class, fill the form with the following parameters:
Set the style parameters of 'points_fast_food' class to the following:
The configuration above will group features with type 'bus_stops' as blue squares, 'traffic_signals' as yellow triangles, 'fast_food' as red circles in the 75 pixel radius with the cluster feature count as a label, and features that are not grouped will be rendered as smaller green circles. 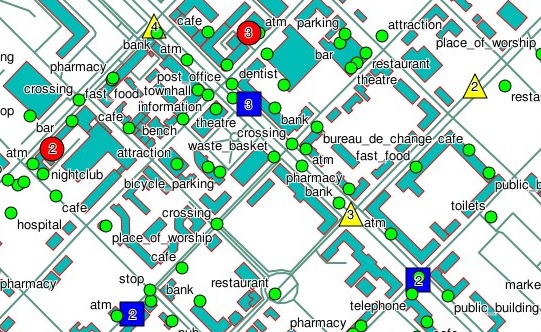 Edit raster layerGeneralActive. Is the layer active or not. If the layer is inactive it can't be used anywhere and by anyone. Data. Name or path of the single georeferenced raster data file. You can use raster image formats supported by GDAL. If only the file name is specified the system looks it in the raster folder. Tile item. Item that contains the location (column) of an individual tile, default is "location" in the tile index. Tile index. Name of the tileindex file. The tileindex contains polygon features for each tile. The item that contains the location of the tiled data is given using the Tile item parameter. When a file is used as the tileindex for raster layers, the tileindex should be a shapefile. Normally the location should contain the path to the tile file relative to raster folder, not relative to the tileindex itself. If the Data parameter contains a value then it is added to the end of the location. Spatial reference system identifier. Specify your raster SRID here if it differs from the display projection. Raster data will be re-projected on the fly which will impact performance, we recommend to build overviews and reproject data to your display projection. Minimum view scale. Minimum scale at which this layer is visible. Scale is given as the denominator of the actual scale fraction. For example if you enter 10000, the layer will be visibile from scale 1:1 to 1:10000. Maximum view scale. Maximum scale at which this layer is visible. Scale is given as the denominator of the actual scale fraction. For example if you enter 10000, the layer will be visibile until 1:10000 scale is reached. Opacity. Sets the opacity level (or the inability to see through the layer) of all classed pixels for a given layer. The value can be an integer in the range (0-100 . A value of 100 is opaque and 0 is fully transparent. Offsite. This parameter tells MapServer what pixel values to render as background (or ignore). Value is specified in hexadecimal format (a hex triplet). You can get the pixel values using image processing or image manipulation programs (i.e. Imagine, Photoshop, Gimp). Information. Is the layer queryable or not. For example if you have an elevation model in a GeoTiff you will be able to get the "height" of the desired location using information tool, or the RGB values if the data is a RGB image. NameSet the name of the layer in all available languages. Default settingsSet the default layer settings of the layer upon user first access. This settings are also used when the layer is served via WMS and when published. View. Is the layer visible by default Information. Is the layer queryable by default WMSThis is identical to Edit vector layer WMS section, please see WMS WCSA WCS (or Web Coverage Service) allows for the publication of "coverages" - digital geospatial information representing space-varying phenomena. In the MapServer world it allows for unfiltered access to raster data. Conceptually it is easy to think of WCS as a raster equivalent of WFS. More information can be found here. Some of the use cases can be found here. Publish privately. Access Web Coverage Service with authentication. Default address is http://domainname/en/default/wcs/private. Publish publicly. Access Web Coverage Service without authentication. Default address is http://domainname/en/default/wcs/public. PublishThis is identical to Edit vector layer Publish section, please see Publish PermissionsResource. Layer resource, for more details on permissions see Access control list. If no resource is selected then "Basic" resource is applied, this means that only members of the "Basic" role and roles that extend it can view the current layer. View privilege. Privilege that allows viewing the current layer Access OWS services privilege. Privilege that allows access via WMS or WFS to the current layer MetadataThis is identical to Edit vector layer Metadata section, please see Metadata Edit WMS layerGeneralActive. Is the layer active or not. If the layer is inactive it can't be used anywhere and by anyone. URL. This is the remote server's online resource URL, just the base URL without any of the WMS parameters. Version. The version of the WMS protocol supported by the remote WMS server and that will be used for issuing GetMap requests. Layers. A list of available layers from source with the current one selected. This list is refreshed when any of the connection parameters is changed. Image format. The image format to use in GetMap requests Information format. The format to use in GetFeatureInfo requests. This is used only if Information is checked. Minimum view scale. Minimum scale at which this layer is visible. Scale is given as the denominator of the actual scale fraction. For example if you enter 10000, the layer will be visibile from scale 1:1 to 1:10000. Maximum view scale. Maximum scale at which this layer is visible. Scale is given as the denominator of the actual scale fraction. For example if you enter 10000, the layer will be visibile until 1:10000 scale is reached. Opacity. Sets the opacity level (or the inability to see through the layer) of all classed pixels for a given layer. The value can be an integer in the range (0-100) . A value of 100 is opaque and 0 is fully transparent. Information. Is the layer queryable or not. NameSet the name of the layer in all available languages. AuthenticationFormat. Authorization type. User name. Authorization username. Password. Authorization password. Default settingsThis is identical to Edit raster layer Default settings, please see Default settings WMSThis is identical to Edit vector layer WMS section, please see WMS PublishThis is identical to Edit vector layer Publish section, please see Publish PermissionsThis is identical to Edit raster layer Permissions, please see Permissions MetadataThis is identical to Edit vector layer Metadata section, please see Metadata Edit WFS layerGeneralActive. Is the layer active or not. If the layer is inactive it can't be used anywhere and by anyone. URL. This is the remote server's online resource URL, just the base URL without any of the WFS parameters. Version. The version of the WFS protocol supported by the remote WFS server and that will be used for issuing GetMap requests. Layers. A list of available layers from source with the current one selected. This list is refreshed when any of the connection parameters is changed. Image format. The image format to use in GetMap requests Information format. The format to use in GetFeatureInfo requests. This is used only if Information is checked. Minimum view scale. Minimum scale at which this layer is visible. Scale is given as the denominator of the actual scale fraction. For example if you enter 10000, the layer will be visibile from scale 1:1 to 1:10000. Maximum view scale. Maximum scale at which this layer is visible. Scale is given as the denominator of the actual scale fraction. For example if you enter 10000, the layer will be visibile until 1:10000 scale is reached. Opacity. Sets the opacity level (or the inability to see through the layer) of all classed pixels for a given layer. The value can be an integer in the range (0-100) . A value of 100 is opaque and 0 is fully transparent. Information. Is the layer queryable or not. NameSet the name of the layer in all available languages. AuthenticationType. Authorization type. User name. Authorization username. Password. Authorization password. Default settingsThis is identical to Edit raster layer Default settings, please see Default settings WMSThis is identical to Edit vector layer WMS section, please see WMS WFSThis is identical to Edit vector layer WFS section, please see WFS PublishThis is identical to Edit vector layer Publish section, please see Publish PermissionsThis is identical to Edit raster layer Permissions, please see Permissions MetadataThis is identical to Edit vector layer Metadata section, please see Metadata Edit javascript layerGeneralActive. Is the layer active or not. If the layer is inactive it can't be used anywhere and by anyone. Container. Container to which the current layer belongs too. Include file. Relative path to the javascript include file from "public/static/js/giscuit/" folder. Is base layer. if checked this layer will be a base layer, otherwise it will work as an overlay. Minimum view scale. Minimum scale at which this layer is visible. Scale is given as the denominator of the actual scale fraction. For example if you enter 10000, the layer will be visibile from scale 1:1 to 1:10000. Maximum view scale. Maximum scale at which this later is visible. Scale is given as the denominator of the actual scale fraction. For example if you enter 10000, the layer will be visibile until 1:10000 scale is reached. Opacity. Sets the opacity level (or the inability to see through the layer) of all classed pixels for a given layer. The value can be an integer in the range (0-100 . A value of 100 is opaque and 0 is fully transparent. Information. Is the layer queryable by default. NameSet the name of the layer in all available languages. Default settingsSet the default layer settings of the layer upon user first access. This settings are also used when the layer is served via WMS and when published. View. Is the layer visible by default Information. Is the layer queryable by default PublishPublish destination. How is the layer published, as an overlay or as a part of a base layer. Hold ctrl and click to select or deselect multiple options. Publish selected. Used for overlays only. Is the overlay selected (visible) by default. PermissionsResource. Layer resource, for more details on permissions see Access control list. If no resource is selected then "Basic" resource is applied, this means that only members of the "Basic" role and roles that extend it can view the current layer. View privilege. Privilege that allows viewing the current layer MetadataThis is identical to Edit vector layer Metadata section, please see Metadata Delete layerRight click on a layer or a container and click Delete. Merged layersOften you need to merge multiple layers into one overlay or a base layer to reduce the number of image requests the browser makes to the server. A merged layer is a collection of one or more layers of any type, the merged result is only visible in publishing module. There are 2 types of a merged layer base layer (Container value set to "/") and overlay (Container value set to to anything but "/"). Only one merged base layer can be visible at a time and it's always at the bottom. Merged overlay is displayed on top of the merged base layer in order specified at Merged layers data table. To create a merged layer click Add button below the Merged layers data table. Name. Display name of the layer. Active. Is the layer active or not. If the layer is inactive it can't be used anywhere and by anyone. Selected. Is the layer selected (visible) by default. Format. JPEG, PNG or PNG24. Select PNG if you want map loading time to be shorter but loose some image quality if your image has more than 256 colors. To have best image quality with increased loading time use PNG24. Minimum view scale. Minimum scale at which this layer is visible. Scale is given as the denominator of the actual scale fraction. For example if you enter 10000, the layer will be visibile from scale 1:1 to 1:10000. Maximum view scale. Maximum scale at which this layer is visible. Scale is given as the denominator of the actual scale fraction. For example if you enter 10000, the layer will be visibile until 1:10000 scale is reached. Container. Container to which the current layer belongs too. If you specify the root container ("/") then this layer will be a base layer, otherwise it will work as an overlay. Clear cache. Clears all the seeded tiles for this layer. Only works when editing the layer. To edit a merged layer click on it's id field and then click Edit button below the Merged layers data table. After you have made the necessary changed click Submit button to save them. To delete a merge layer click on it's id field and then click Delete button below the Merged layers data table. For better understanding see Seeding a map cache.
COPYRIGHT ® 2012, VEC |